Graphical Interface (Workbench)
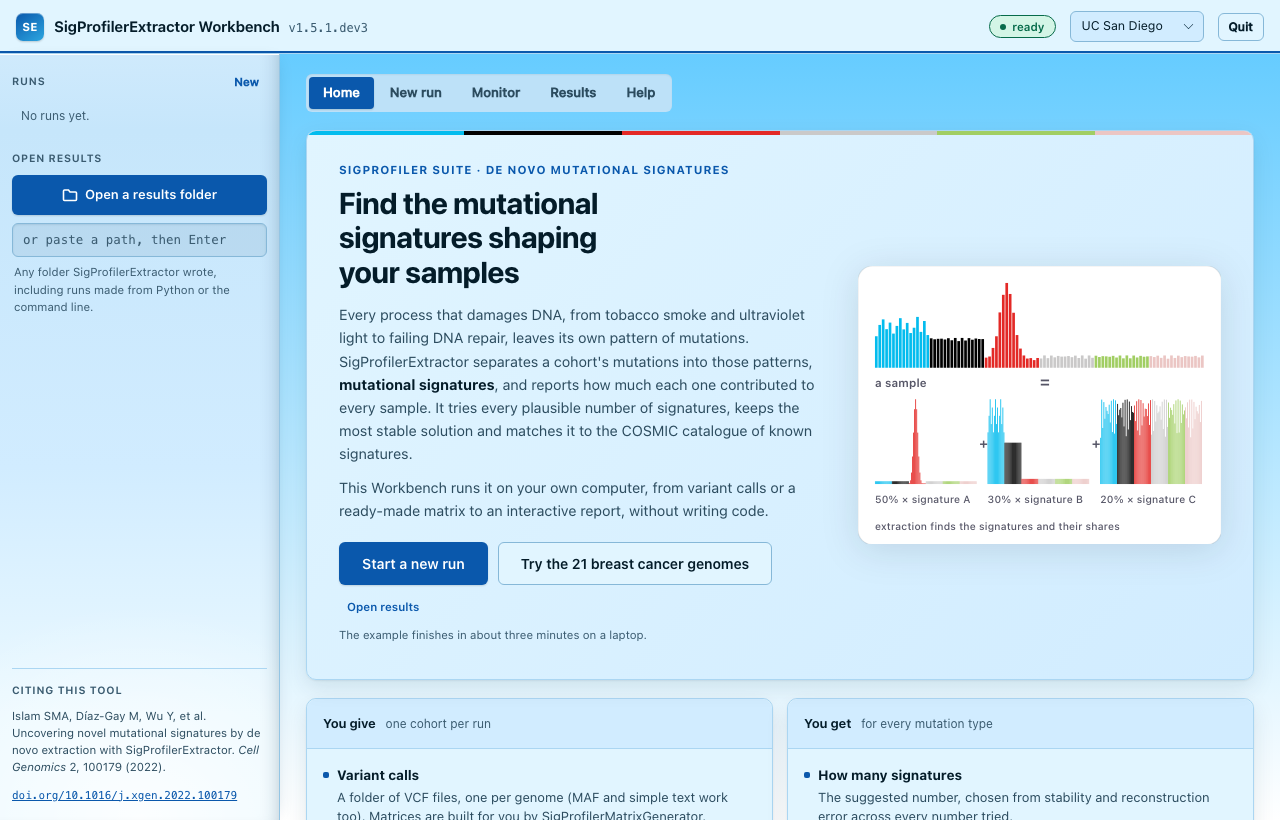
The SigProfilerExtractor Workbench runs SigProfilerExtractor from your browser, without writing code. Choose the input, check the settings, start the run, follow its progress and explore the results, including the interactive dashboard SigProfilerExtractor writes for every run.
Everything runs on your own computer: the Workbench is a small server on this machine, and your browser is its window. Your data never leaves the computer.
On a server or cluster
The Workbench can also run on a Linux server or a SLURM cluster (with a GPU if it has
one) and be used from the browser on your own computer: ./spe-server start, or
./spe-server submit on a cluster's login node. See
Workbench on a Server or Cluster.
It calls the same function as Python and the command line, with the same defaults, so a run started here writes exactly the files described in Using the Tool - Output.
Install and start
The Workbench comes with SigProfilerExtractor: download or clone the repository and start it from that folder with a double-click. The only requirement is Python 3.9 or newer.
- If Python 3 is not installed, install it from python.org (or with Homebrew or conda).
- In the SigProfilerExtractor folder, double-click
launch_web.command. - The first time, macOS may say it cannot verify the file: right-click it, choose Open, then Open again. macOS remembers this choice.
- A Terminal window opens and sets up the Workbench's private Python environment. This takes a few minutes the first time (PyTorch is large) and is skipped afterwards.
- The Workbench opens in your browser. Keep the Terminal window open while you use it; Quit in the Workbench's top bar stops it.
- If Python 3 is not installed, install it from
python.org. Tick Add python.exe to
PATH in the installer (the
pylauncher it installs also works). - In the SigProfilerExtractor folder, double-click
launch_web.bat. - If Windows SmartScreen appears, click More info, then Run anyway.
- A console window opens and sets up the Workbench's private Python environment. This takes a few minutes the first time (PyTorch is large) and is skipped afterwards.
- The Workbench opens in your browser. Keep the console window open while you use it; Quit in the Workbench's top bar stops it.
In a terminal, in the SigProfilerExtractor folder:
./launch_web.sh
The first start sets up the private Python environment (a few minutes), then opens the Workbench in your browser.
If SigProfilerExtractor is already installed in a Python environment, either command starts the Workbench from that environment, with no separate setup:
SigProfilerExtractor web
sigprofilerextractor-web
On a Linux server or a SLURM cluster, the spe-server launcher installs and runs it,
with no admin rights, and prints a link to open from your own computer:
git clone -b workbench-server https://github.com/SigProfilerSuite/SigProfilerExtractor.git
cd SigProfilerExtractor/server
./spe-server start     # on this machine
./spe-server submit    # or, from a cluster's login node, as a SLURM job
Every step, option and SLURM setting: Workbench on a Server or Cluster.
The browser opens http://127.0.0.1:<port>/. A free port is picked on every start, and
the window that started the Workbench prints the address. Starting it while it is
already running prints the address of the running one instead of starting a second.
What gets installed, and where
| What | Where | Removed by the uninstaller |
|---|---|---|
| A private Python environment with SigProfilerExtractor and its dependencies | .venv-dashboard, inside the SigProfilerExtractor folder |
yes |
| Reference genomes installed through the Workbench | inside that environment (unless you chose another Reference files folder) | yes |
| Run records: each run's settings and log | ~/.cache/sigprofilerextractor (macOS, Linux), %LOCALAPPDATA%\SigProfilerExtractor (Windows) |
yes |
| Your results | each run's output folder, by default under SigProfilerExtractor_results in your home folder |
no |
| Downloaded packages, kept so later installs are quicker | uv's cache: ~/.cache/uv (macOS, Linux), %LOCALAPPDATA%\uv\cache (Windows); or pip's cache if pip was used |
no: uv cache clean (or pip cache purge) empties it |
Nothing else is installed: no system files, services or registry entries. The launcher
reinstalls into its environment only when setup.py or pyproject.toml changes, for
example after updating the repository.
The launcher installs with uv, which downloads and installs
packages in parallel and is much quicker than pip for large ones such as PyTorch. It uses
the uv already on your PATH if there is one; otherwise it first adds uv to the
Workbench's own environment. If uv cannot be added or cannot install, the launcher says so
and uses pip instead. To always use pip, for example behind a network that only allows
pip's configured package mirror, set the environment variable SPE_WEB_INSTALLER=pip.
Launch options
| Option | Meaning |
|---|---|
--no-launch |
Start without opening a browser tab |
--stop |
Stop the running Workbench, and any run it started, then exit |
--volume PATH |
Folder of installed reference genomes and reference files (the volume parameter) |
--reinstall |
Force a fresh install into .venv-dashboard (launcher scripts only) |
./launch_web.sh --no-launch      # start without opening a tab
./launch_web.sh --stop           # stop it from another terminal
Home
The Workbench opens on a page that introduces the tool: what it takes, what it gives back, how the method works, and the runs you made recently. Try the 21 breast cancer genomes fills in a complete run that finishes in a few minutes: the quickest way to see every part of the Workbench.
Setting up a run
The New run tab is five numbered cards and a collapsed Advanced settings card. A card's number turns green once it is complete. Start run stays disabled, and the line beside it names the first thing still missing, until every card is complete.
Examples
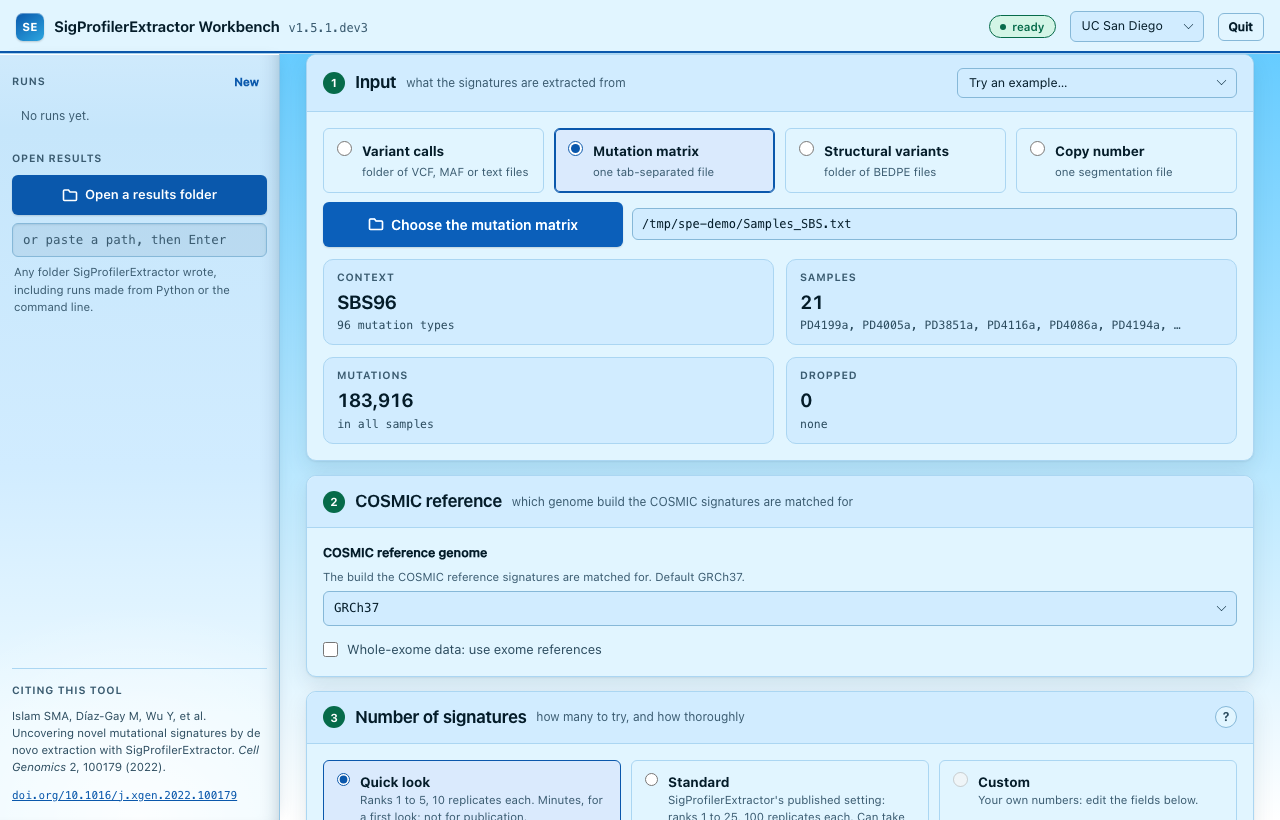
Try an example, at the top of the Input card, fills in any of the examples that ship with SigProfilerExtractor, with the Quick look setting:
| Example | Input |
|---|---|
| 21 breast cancer genomes | SBS96 matrix |
| 5 genomes from VCFs | variant calls on GRCh37 (copied before the run, since the matrices are written into the input folder) |
| Doublet substitutions | DBS78 matrix |
| Small insertions and deletions | ID83 matrix |
| Copy-number profiles | CNV48 matrix |
| Structural variants | SV32 matrix |
| Battenberg segments | copy-number segmentation file |
1. Input
Choose the kind of input, then the file or folder (with the button, or by pasting a path and pressing Enter), or click Upload to copy it from your computer: select all of a folder's files at once, or the one file. Uploads go into a new folder (on your own computer, in the Workbench's cache folder), which then becomes the input. The Workbench reads the input before anything runs:
| Kind | Choose | The Workbench reports |
|---|---|---|
| Variant calls | a folder of VCF files, one per sample (MAF and simple text also work) | format, samples, mutations and indels, files |
| Mutation matrix | one tab-separated file: mutation types in the first column, one column per sample | the context (from the number of rows), samples, mutations, samples that will be dropped |
| Structural variants | a folder of BEDPE files | samples, variants |
| Copy number | one segmentation file, plus the caller that made it (ASCAT, ASCAT_NGS, Battenberg, FACETS, PURPLE, Sequenza, ABSOLUTE, TCGA) | samples, segments |
A matrix's context follows from its rows, as in SigProfilerExtractor: 96, 288, 384, 1536 or 4608 for SBS, 78 for DBS, 83 for ID, 48 for CNV and 32 for SV. Empty and all-zero samples are dropped, and the Workbench names them; a sample with only some values missing would stop the run, so the Workbench refuses it before the run starts.
Note
For variant calls, SigProfilerMatrixGenerator writes input/ and output/ folders
into the folder of calls while it builds the matrices, so that folder must be
writable.
2. Genome and contexts
For variant calls: the reference genome they were called against (installed from the card if needed, about 3 GB for a human genome, once), the mutation contexts to extract (SBS96, DBS78 and ID83 by default; SBS288, SBS384, SBS1536 and SBS4608 too), and whether the data is whole-exome. The card warns if the calls name a different assembly, and when they hold no indels (ID83 would be skipped).
For other inputs: the genome build of the COSMIC reference signatures. It is set for you for CNV48 (GRCh37) and SV32 (GRCh38), the builds those COSMIC signatures are defined on.
3. Number of signatures
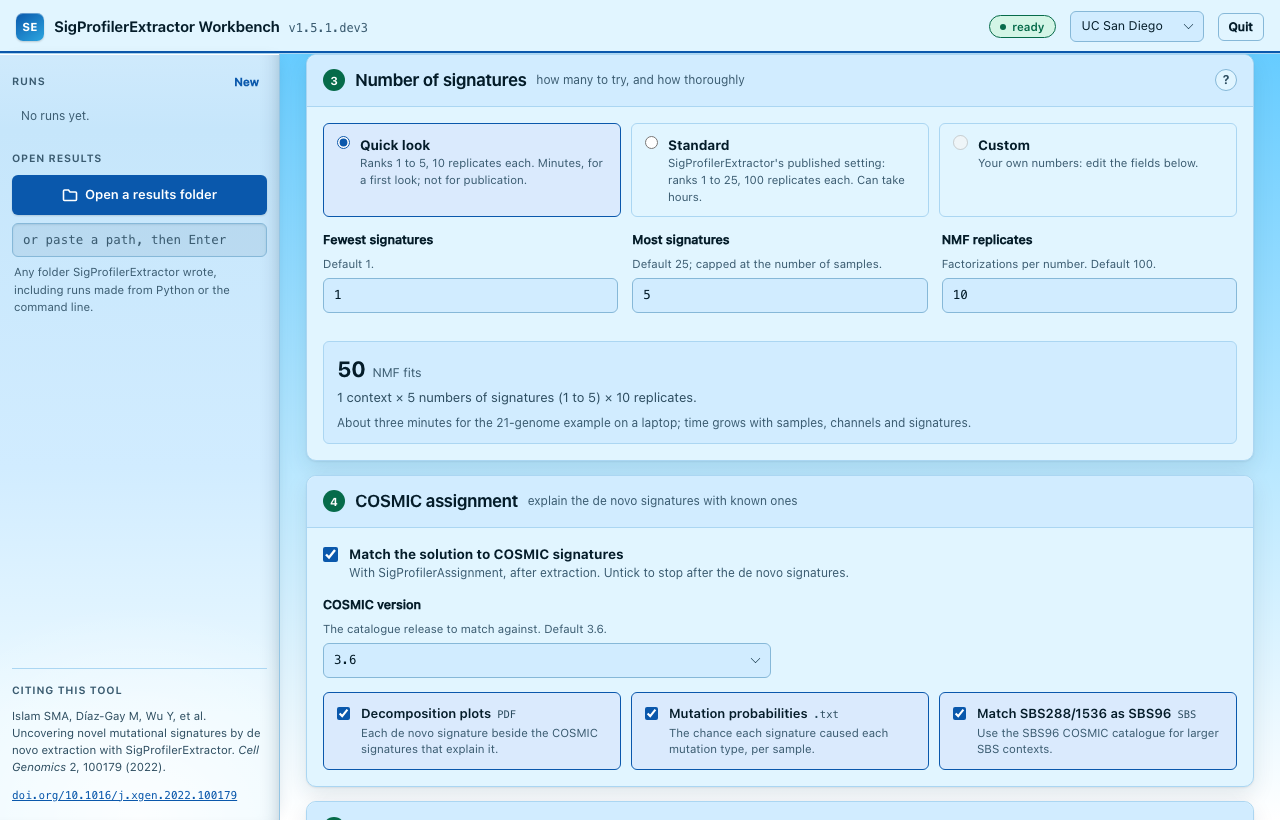
How many signatures to try (the rank), and how many NMF replicates for each:
| Preset | Numbers tried | Replicates | Use |
|---|---|---|---|
| Quick look | 1 to 5 | 10 | a first look at a cohort, in minutes |
| Standard | 1 to 25 | 100 | SigProfilerExtractor's published setting, for results you report |
Editing a field switches to Custom. The box under the fields adds up the work: contexts × numbers of signatures × replicates NMF fits, the main driver of run time. The largest number is capped at the number of samples, as SigProfilerExtractor does.
4. COSMIC assignment
On by default: after extraction, SigProfilerAssignment explains each de novo signature
with COSMIC signatures (v3.6 by default) and assigns them to every sample. The options
choose the decomposition plots, the mutation probability tables, and whether SBS288 and
SBS1536 are matched with the SBS96 catalogue. Untick it to stop after the de novo
signatures (stop_after_extraction).
5. Output
The folder the results go to, filled in from the input's name. If it already holds a SigProfilerExtractor run, the run does not start until you choose Use a new folder (the next free name) or Replace the earlier results, which deletes only what SigProfilerExtractor wrote there.
Advanced settings
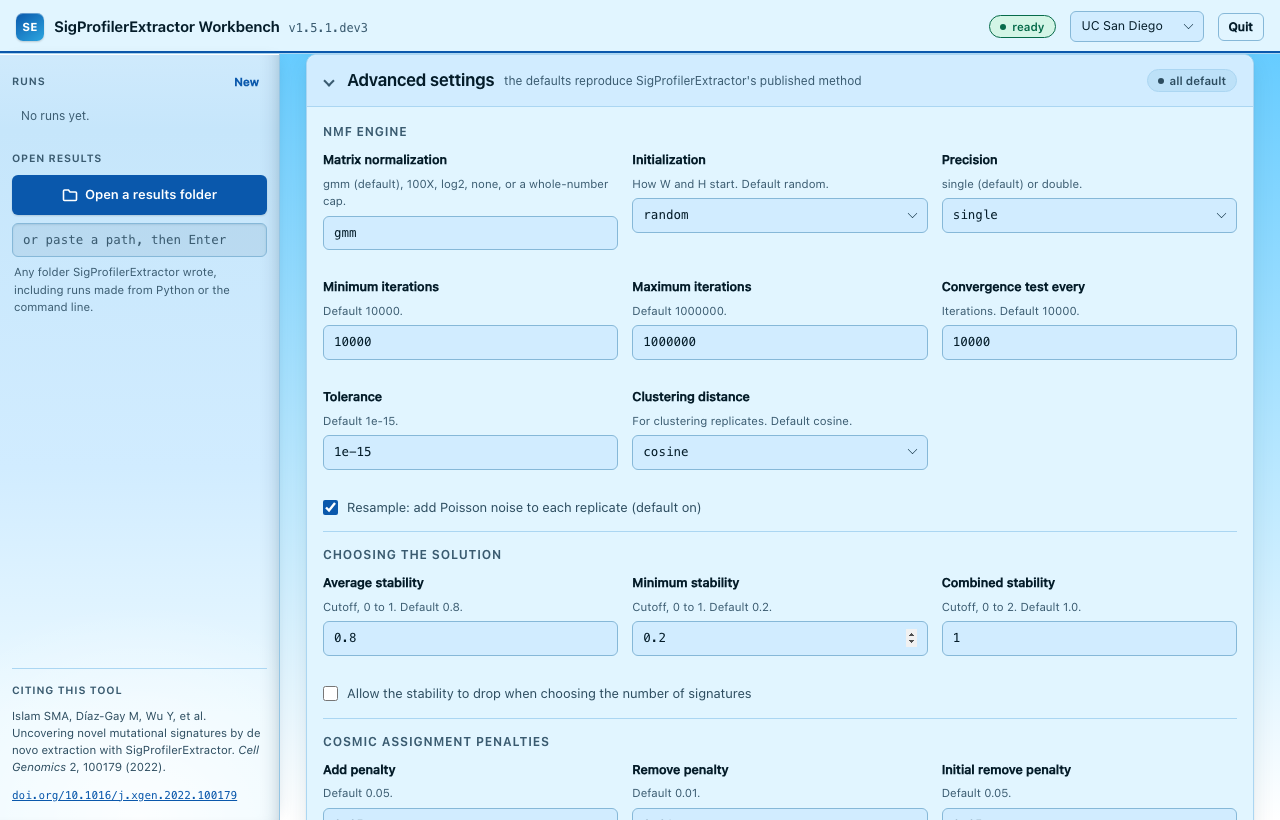
Every other parameter, grouped as SigProfilerExtractor reports them, each with its default:
| Group | Settings |
|---|---|
| NMF engine | matrix normalization, initialization, precision, minimum and maximum iterations, convergence test interval, tolerance, clustering distance, resampling |
| Choosing the solution | average, minimum and combined stability cutoffs; allowing the stability to drop |
| COSMIC assignment penalties | add, remove and initial remove penalties |
| Computer | CPUs for extraction and for assignment; the GPU and its batch size (offered only when a CUDA GPU is present) |
| Reproducibility and outputs | a seeds file to repeat an earlier run exactly (checked when chosen), the dashboard, every replicate's matrices, the reference files folder |
The card's header counts the settings changed from the defaults; Restore the defaults resets them all.
Following a run
Starting a run opens the Monitor tab:
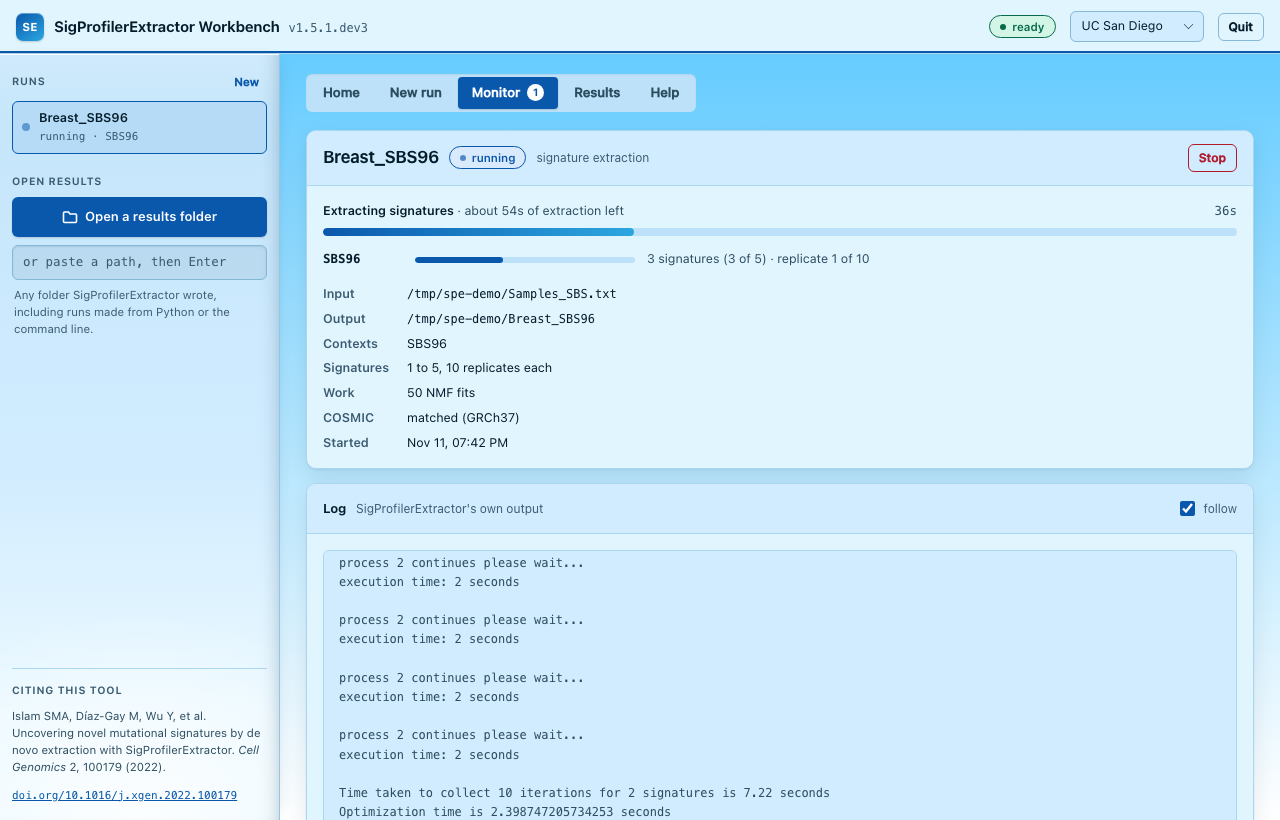
- Progress for the whole run, and one row per mutation context: the number of signatures being tried, the replicate, and the COSMIC step. Once a few numbers have finished, it estimates the extraction time left.
- Details: input, output, contexts, the numbers tried and the total work.
- Log: SigProfilerExtractor's own output, as it is written. Untick follow to scroll back while it runs.
- Stop ends the run and all its worker processes.
Each run is a separate process, so a long run never slows the page, and runs keep their records after the Workbench is restarted. Every run is listed in the sidebar under Runs. A finished run has two buttons there and on the Monitor tab:
| Button | What it does |
|---|---|
| × (Remove from list) | Takes the run off the list. Its results stay on disk, and Undo brings it back. |
| Bin (Delete) | Deletes the run and what SigProfilerExtractor wrote for it, after asking (with the path, file count and size). Other files in the folder stay. This cannot be undone. |
Exploring results
Open a finished run from Monitor, or click Open a results folder in the sidebar and choose any folder SigProfilerExtractor wrote, including runs made from Python or the command line.
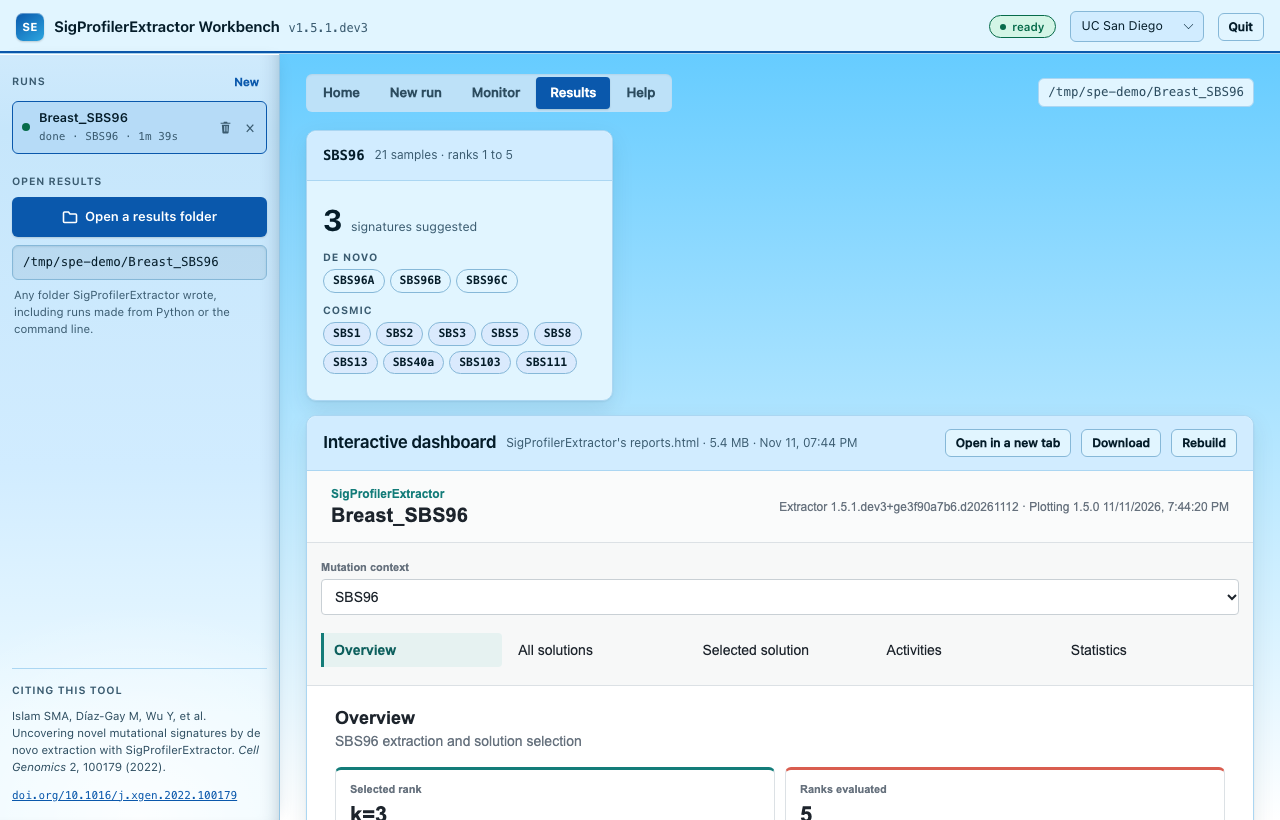
The Results tab shows:
- One card per mutation context: the suggested number of signatures, the de novo signatures, and the COSMIC signatures that explain them.
-
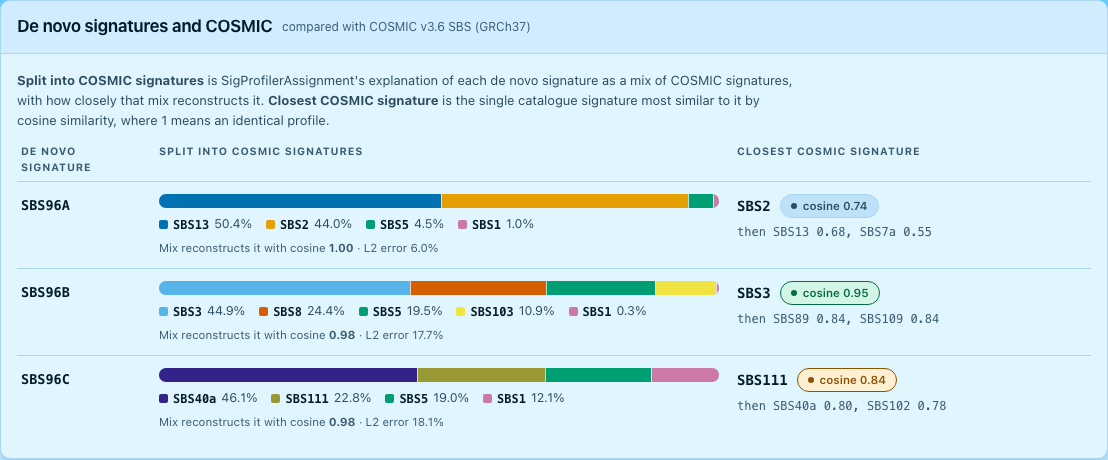
De novo signatures and COSMIC: for each de novo signature of the suggested solution, two views of how it relates to known signatures:
- Split into COSMIC signatures: SigProfilerAssignment's decomposition of the signature into a mix of COSMIC signatures, as a bar with each signature's share, and how closely that mix reconstructs it (cosine similarity and L2 error).
- Closest COSMIC signature: the single COSMIC signature most similar to it by cosine similarity, with the next two. It is compared with the same catalogue the assignment used (the COSMIC version, genome build and exome setting of the run); SBS288 and SBS1536 signatures are compared as SBS96. Green marks a cosine of 0.9 or more, usually read as the same signature; amber 0.8 to 0.9.
A signature with a good split but no close single match is a mix of known signatures; one with a close match is essentially that known signature. - The interactive dashboard: SigProfilerExtractor's own
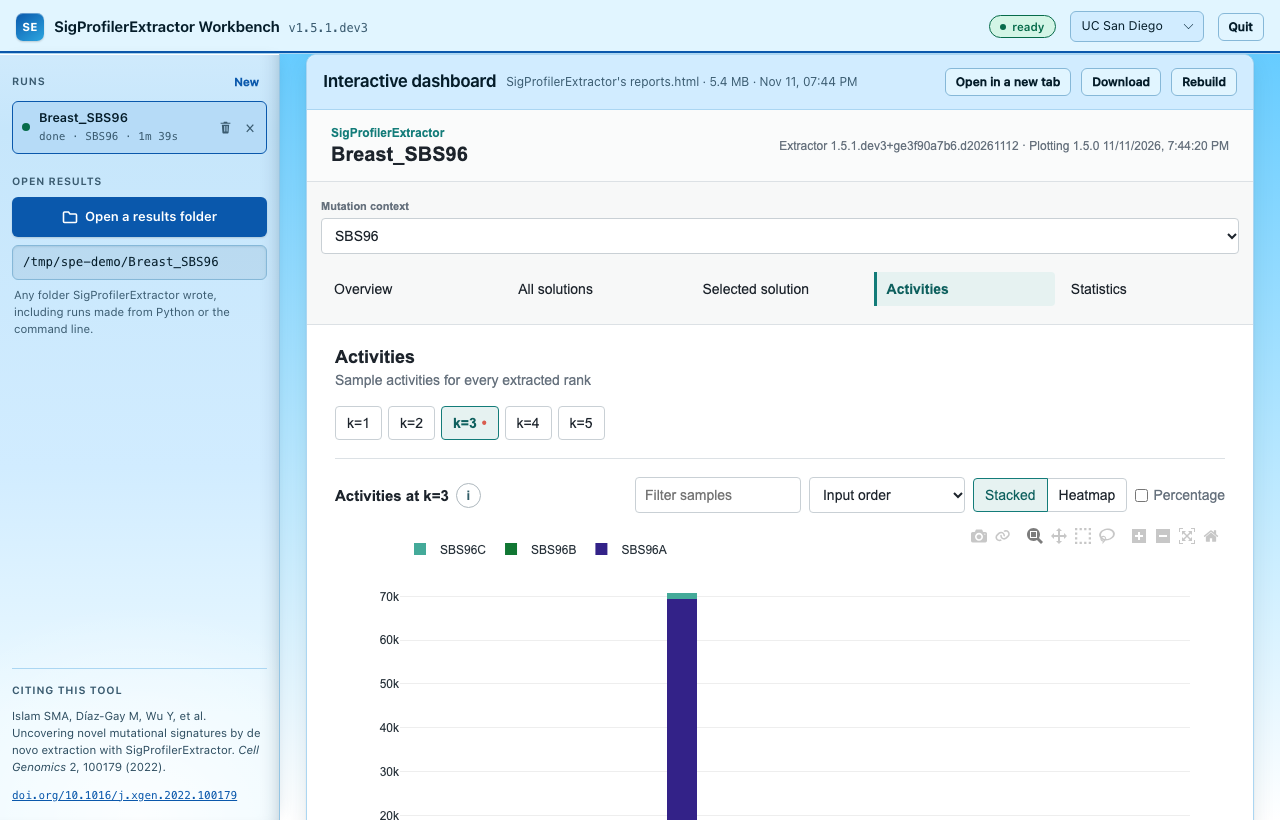
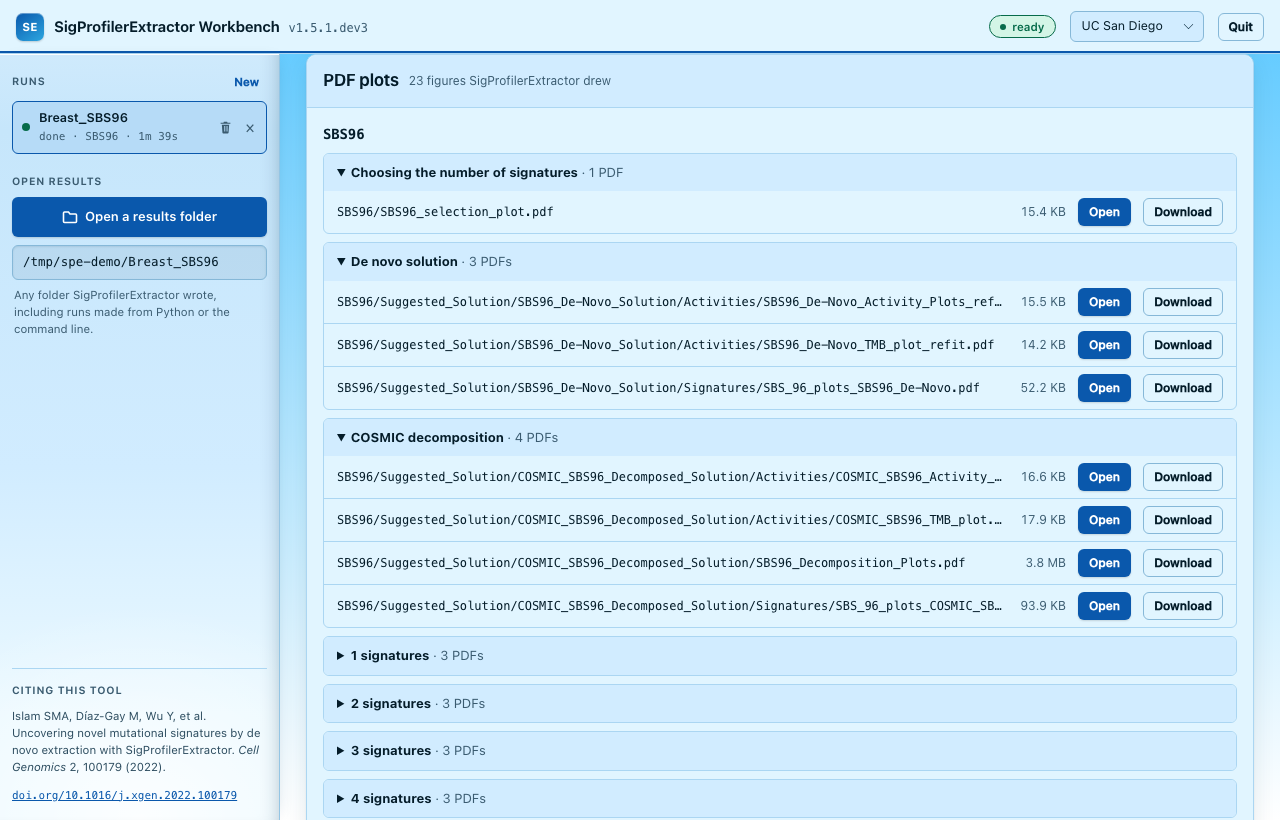
reports.html, shown as it is. Its tabs cover the overview and how the number of signatures was chosen, every solution tried, the selected solution (de novo and COSMIC), the activities in every sample and the statistics. Open in a new tab gives it the whole window, and Download saves it: it is a single file that needs nothing else, ready to share. A folder without one (older runs, or runs with the dashboard turned off) offers Build the dashboard, which writes it from the files there. - PDF plots: the selection plot, the suggested solution's signatures and activities, the COSMIC decomposition plots, and each number of signatures tried. Open shows a PDF in a new tab. - Tables and run files: signatures, activities, statistics, the COSMIC mapping,JOB_METADATA.txtandSeeds.txt. - Download all as .zip (at the top) packs the whole results folder into one file, which helps most when the Workbench runs on a server.
More room for the results
Both side panels, the Workbench's (runs and results folders) and the dashboard's (context and views), can be resized or hidden:
- Drag the edge of a panel to make it wider or narrower; drag it all the way left to hide it.
- Click the panel button (the square icon at the far left of the top bar, and beside the dashboard's title) to hide or show the panel in one click.
- Double-click the edge, or focus it and use the arrow keys, Home and End, to do the same from the keyboard.
With both hidden, the dashboard and its charts use the full window. The Workbench remembers its panel's width and whether it is hidden. On narrow screens the panels sit above or below the content instead, so there is nothing to resize. A dashboard built before this feature has no panel controls; Rebuild writes it again with them.
Uninstall
The Workbench installs nothing outside the places listed under What gets installed, and where.
With a double-click
- Click Quit in the Workbench. (The uninstaller refuses to run while the Workbench or one of its runs is still going.)
- In the SigProfilerExtractor folder, double-click
uninstall_web.command(macOS) oruninstall_web.bat(Windows). On Linux, run./uninstall_web.sh. The same first-time prompts as for starting may appear: right-click and Open on macOS; More info, then Run anyway on Windows. -
It lists what it will remove and asks before doing anything:
SigProfilerExtractor Workbench uninstaller ------------------------------------------ This removes: - the Python environment /path/to/SigProfilerExtractor/.venv-dashboard (1.9G) including the reference genomes installed in it: GRCh37 - the records of 3 run(s) in ~/.cache/sigprofilerextractor (settings and logs, not results) It keeps your results (each run's output folder, such as ~/SigProfilerExtractor_results) and this folder (/path/to/SigProfilerExtractor). Remove them? Type y and press Enter: -
Type y and press Enter. To remove the rest, delete the SigProfilerExtractor folder and, if you no longer need them, your results.
Double-clicking launch_web.command or launch_web.bat again later sets everything up
anew.
By hand
- Click Quit in the Workbench.
- Delete the
.venv-dashboardfolder inside the SigProfilerExtractor folder. - Delete the run records:
~/.cache/sigprofilerextractoron macOS and Linux,%LOCALAPPDATA%\SigProfilerExtractoron Windows.
Themes
The menu in the top bar switches between UC San Diego, UAlbany, SigProfilerSuite and Night. The choice is remembered by your browser. The dashboard keeps its own light style in every theme.
Security
The Workbench is meant for one person on their own computer. It listens only on
127.0.0.1 and has no login, so it protects itself in other ways:
- It answers only requests addressed to this machine by name.
- Anything that acts (starting or stopping a run, uploading files, installing a genome, building a dashboard, opening a file picker, quitting) must come from the Workbench's own page, carrying a secret written into that page when it starts.
- The dashboard runs in a sandbox: it cannot read the Workbench's page, call the Workbench, or load anything from the network.
The Workbench can read any folder you can and starts processes on your behalf, so do not
expose it on a network. To use it on a server, start it with spe-server, which puts it
behind a link with a private token
(Workbench on a Server or Cluster).
Troubleshooting
"Python 3 was not found." Install Python 3.9 or newer (see Install and start), then double-click the launcher again.
macOS says the file cannot be opened, or is from an unidentified developer. Right-click the file, choose Open, then Open again.
Windows protected your PC. Click More info, then Run anyway.
The first start takes a long time. It installs SigProfilerExtractor's dependencies, PyTorch among them, once.
The page stopped responding after a restart. Each start uses a new address. Use the address the launcher printed, or double-click the launcher again: if the Workbench is already running, it prints that address.
A VCF run stops with a genome error. Install the genome from the Genome card, or point Reference files folder (Advanced) at the folder where it is installed.
The Results tab says the run did not finish. The run stopped or failed, and the files it wrote may be incomplete. Its log is on the Monitor tab.
The uninstaller says the Workbench is still running. Click Quit in the Workbench
(or run ./launch_web.sh --stop, or launch_web.bat --stop), then run it again.